
⚡ TL;DR: best concealer brush
The best concealer brush comes down to the area we need to cover: a small pointed tip gives us neat spot correction, while a curved paw or half-moon head follows the under-eye curve more closely. Dense domes help blend cream concealer across a larger patch, but no single head excels at every job.
Top Picks
- 🏆 Best Overall — tarte Paw Brush — Angled reach with flexible coverage
- 🥈 1st Runner-up — Real Techniques Spot Brush — Pinpoint placement for small blemishes
- 🥉 2nd Runner-up — e.l.f. Tap & Blend — Accessible, controlled tapping for beginners
Some mornings, concealer goes at the inner corner of the eye and other mornings it is just for one tiny mark. Searching for the best concealer brush gets easier when we stop expecting the same head to cover both jobs equally well. We focused on brush shape, density and what each tool is designed to do, rather than treating a larger price tag as proof of a better finish.
✨ Inside This Makeup Brushes & Sponges Guide
Quick Comparison: Best Concealer Brush
Each of these eight brushes has its own job, so start with where we apply concealer most often. The head shape and formula fit are more useful comparisons than a temporary price.
| Brush | Best For | Head Shape | Formula Fit |
|---|---|---|---|
| tarte Paw Brush | All-round application | Angled paw | Concealer |
| Hourglass Vanish Brush | Under-eye curves | Half-moon | Liquid or cream |
| Real Techniques Spot Brush | Individual blemishes | Small precision tip | Liquid or cream |
| e.l.f. Tap & Blend | Everyday budget use | Dense paw | Concealer |
| IT Cosmetics Dual Airbrush #2 | Place then blend | Dual-ended | Concealer |
| Sigma F26 Concealer Brush | Fuller-coverage placement | Dense dome | Liquid or cream |
| ABH Brush 18 | Flat-edge detail | Flat tapered dome | Emollient or powder |
| Morphe M133 | Quick buffing | Compact dome | Cream or liquid |
Best Concealer Brush: 8 Targeted Picks
Our best tool depends on whether we are pressing concealer into a narrow spot, following a curved area or buffing a larger patch. Every pick here has a clear purpose, plus a limitation worth knowing before you buy.
tarte Concealer Paw Brush
Best Overall
An angled paw-shaped head makes a single brush handy for both broad blending and tighter facial corners.
If concealer goes both beneath our eyes and beside our nose, the brush needs to handle two jobs. The angled, paw-shaped synthetic bristles give you a practical middle ground: a wider surface to press product in and a narrower edge to guide placement.
That balance earns this its all-rounder role, rather than a tiny spot-only brush. We can work around the inner corner without immediately changing tools, although the head still covers more space than a pinpoint tip.
Bottom line: A versatile choice for mixed under-eye and facial coverage; use a smaller tip for one tiny mark.

- ✅ Angled paw profile reaches facial corners
- ✅ Synthetic fibers made for concealer application
- ✅ Patting technique supports controlled placement
- ❌ Less pinpoint control for a very small blemish
- ❌ Not as broad as a large dome for fast blending

🧪 Lash Lab Notes — Engr. Nusrat (Engineer & Beauty Enthusiast)
That angled edge provides a second contact point without a second tool. We can press the broad side onto a larger patch, then turn the brush for a tighter corner.
- 💡 Editor’s Note: We like the simplicity of one shape doing two sensible jobs. If you mostly cover isolated pinhead spots, we would still pick a dedicated precision tip rather than expect this paw to behave like one.
To see whether the head shape appeals in everyday routines, explore feedback on tarte Paw Brush.
Choose it for concealer around the nose and under eyes.
Care tip: Pat product onto the area before gently blending its edge.
If your main concern is the under-eye curve itself, the next shape is more specialized.
Hourglass Vanish Seamless Finish Concealer Brush
Best for Under Eyes
A half-moon head follows a curved under-eye area rather than treating it like a flat patch.
The under-eye area has a curve and can be narrow near the inner corner. A half-moon concealer brush fits that contour: its shaped edge gives you a more deliberate path for liquid or cream concealer.
Hourglass Vanish Brush pairs that head with soft Taklon fibers and a weighted metal handle. They are useful design details, not proof that the brush will stop creasing or outperform a careful technique with a less expensive tool.
Bottom line: Strong under-eye shape match for cream or liquid concealer, but not essential for occasional spot coverage.

- ✅ Half-moon profile designed for under-eye contours
- ✅ Soft Taklon fibers
- ✅ Weighted handle for a substantial grip
- ❌ Broad contour shape is less suited to tiny isolated marks
- ❌ Specialized design may be unnecessary for occasional concealer
🧪 Lash Lab Notes — Dr. Sazia (Medicine Specialist & Beauty Enthusiast)
A curved head has the clearest purpose when your main placement area is under the eye. We should keep pressure light along that delicate contour; a shaped brush is not a reason to tug at the skin.
- 💡 Editor’s Note: We would pay attention to where you actually put concealer, not the luxury finish of the handle. If most of it goes beneath both eyes, the contour is relevant; if you touch up one spot, it is not the most direct tool.
Want to look into how people use the half-moon design? Read shopper impressions of Hourglass Vanish Brush.
Best for people who concentrate liquid or cream concealer beneath the eyes.
Care tip: Use light pats or small blending motions along the curved area.
For one small blemish, though, a fraction of that contact area can be more useful.
Real Techniques Spot Concealer Brush
Best for Blemishes
A small precision tip keeps concealer right on the spot you actually want to cover.
Covered one mark only to spread concealer onto the surrounding foundation? A small pointed brush is built for the opposite approach: place the product where the mark is, then soften only its edge.
The Real Techniques Spot Concealer Brush uses plush synthetic fibers and is specified for targeted work around blemishes, redness and the nose. That narrow contact area makes sense for liquid or cream formulas when broad sweeping would disturb more makeup than necessary.
Bottom line: Our targeted spot pick when placement matters more than speed; it is slower for two full under-eyes.

- ✅ Small tip isolates a spot
- ✅ Synthetic fibers for liquid or cream concealer
- ✅ Useful near the nose and small red areas
- ❌ Tiny head takes longer on broad under-eye areas
- ❌ Not intended for quick all-over buffing
🧪 Lash Lab Notes — Dr. Rabeya (Dentist & Beauty Enthusiast)
With a very small head, we can cover the mark rather than recolor the whole area around it. After placing concealer, blend around the edge rather than scrubbing across the center.
- 💡 Editor’s Note: Our pick would be precision before extra coverage for a single blemish. You may find the slower application worthwhile because the brush gives you fewer reasons to disturb already-finished foundation.
If pinpoint touch-ups sound like your routine, examine current owner feedback for Real Techniques Spot Brush.
Pick it for individual blemishes or small patches beside the nose.
Care tip: Target redness with small amounts of liquid or cream concealer.
But precision does not have to mean spending much on a dedicated tool.
e.l.f. Tap & Blend Concealer Brush
Best Budget
A dense paw tip puts controlled tapping within reach of a simple everyday routine.
We do not need a big brush collection to learn where concealer belongs. This dense synthetic paw head keeps the movement simple: pat product into place, then blend just far enough to soften the edge.
The e.l.f. Tap & Blend Concealer Brush is made for under-eyes and blemishes, and its wood handle has an FSC-certified material claim. Its strength is a flexible everyday shape, not the razor-fine accuracy of the smallest spot brush.
Bottom line: An approachable starting point for everyday concealer, with less pinpoint accuracy than a narrow precision tip.

- ✅ Dense paw shape works with tapping
- ✅ Designed for under-eye and spot use
- ✅ FSC-certified wood handle
- ❌ Paw footprint may cover more than a tiny blemish
- ❌ A dedicated half-moon follows the under-eye curve more specifically
🧪 Lash Lab Notes — Fauzia (University Student & Beauty Enthusiast)
The tap-and-blend motion is easy to follow even if we are getting used to brushes. We can begin with a thin layer so the dense tip does not move more product than you need.
- 💡 Editor’s Note: For a first concealer brush, we lean toward a useful shape over extra features you may never touch. It is a sensible way to learn whether you like a paw tip before deciding if a more specialized head earns a place in your bag.
Curious how this affordable option works for other users? Check reviews of e.l.f. Tap & Blend.
A practical first brush for controlled under-eye and blemish blending.
Care tip: Tap concealer into place, then feather the outside edge.
If one tool with two separate working ends sounds even more convenient, consider the next option.
IT Cosmetics Heavenly Luxe Dual Airbrush Concealer Brush #2
Best Dual-Ended
Two working ends separate precise placement from softer blending in one handle.
Sometimes one perfect brush head is not the answer; it is switching between putting concealer down and diffusing it. This dual-ended brush makes those two jobs easy to tell apart, with a flat or tapered end and a rounded, fluffier end.
You can press product into a targeted area first, then turn the handle to soften the boundary. Synthetic fibers and protective caps round out the design, although two exposed working ends call for a little more attention when you store it.
Bottom line: Useful for people who want separate placement and blending heads without carrying two brushes.

- ✅ Flat and fluffy heads serve distinct tasks
- ✅ One handle for placement and blending
- ✅ Protective caps included
- ❌ Two brush ends require care when storing
- ❌ More hardware than a simple single-tip brush
🧪 Lash Lab Notes — Engr. Nusrat (Engineer & Beauty Enthusiast)
This design makes the two-stage motion obvious: set concealer down, then diffuse the line. Use the flat end sparingly so the fluffy end does not have a thick ridge to move.
- 💡 Editor’s Note: We think this is the most useful kind of dual-ended design: the ends have different jobs. If you always use a single tapping motion, however, you may not gain much from the extra end.
For a closer look at whether buyers use both ends regularly, browse reactions to IT Cosmetics Dual Airbrush #2.
Good for cream concealer users who separate placement from blending.
Care tip: Apply with the flat end and blend with the fluffy end.
One dense dome can be the simpler choice when building coverage is the priority.
Sigma Beauty F26 Domed Concealer Brush
Best for Fuller Coverage
A dense rounded head can keep cream concealer concentrated before the edges are blended.
Want to cover a slightly larger area without immediately sweeping your concealer away? A dense dome gives you a compact contact surface for pressing liquid or cream product into place.
Sigma describes its F26 as a domed concealer and color-corrector brush. That intended use supports a controlled press-and-buff approach, but it does not prove a particular coverage level or tell you how it will wear with every concealer formula.
Bottom line: A sensible dense-dome option for concentrated cream coverage; avoid it for the tiniest isolated mark.

- ✅ Dense domed shape for pressing product
- ✅ Designed for liquid and cream concealer
- ✅ Can blend edges after placement
- ❌ Rounded head lacks a very fine point
- ❌ Broad motions can spread a precise correction
🧪 Lash Lab Notes — Mahmuda (Homemaker & Beauty Enthusiast)
Press first, then move only around the edge once the center is covered. A dome is most helpful when the area is bigger than one pinpoint blemish.
- 💡 Editor’s Note: We would not confuse the brush’s density with a promise of full coverage from any formula. It simply gives you a head that supports building product in a defined area, and careful application still does the rest.
See how the compact dome fits into actual makeup routines by checking responses to Sigma F26 Concealer Brush.
A fit for cream or liquid concealer on moderate-sized facial patches.
Care tip: Press cream concealer first and buff only the outer boundary.
For a crisp edge or a smaller detail, a flat tapered head may be better.
Anastasia Beverly Hills Brush 18 – Precise Conceal Brush
Best Flat Precision Brush
A small flat tapered surface lets you place concealer into narrow areas deliberately.
A round brush does not always help when you want to trace along a sharp little edge. The flat, tapered dome of Brush 18 offers a narrower placement surface for a controlled touch near a small facial feature.
Anastasia Beverly Hills describes it for precise concealer application, and the outline notes compatibility with emollient or powder products. That gives it broader texture flexibility than some liquid-and-cream-focused options, though the slim profile is not built for speed.
Bottom line: Best for controlled placement in narrow spaces, not rapid under-eye blending.

- ✅ Flat tapered head supports detail work
- ✅ Small profile reduces broad contact
- ✅ Can handle targeted emollient or powder application
- ❌ Narrow profile takes time on large areas
- ❌ Not intended as a quick wide-area buffer
🧪 Lash Lab Notes — Dr. Rabeya (Dentist & Beauty Enthusiast)
A flat edge is useful when placement needs to stop at a clear boundary. Work with a little product at a time so the brush does not leave a hard stripe that needs wider blending.
- 💡 Editor’s Note: If you enjoy exact placement, this shape gives you a reason to own a second brush. We would not make it your only tool if most mornings involve a quick sweep beneath both eyes.
To judge whether the narrow shape matches your technique, review buyer notes for ABH Brush 18.
Choose it for detailed concealing or small areas needing a flat edge.
Care tip: Apply a small amount precisely, then soften the visible boundary.
When the job is a larger patch and you want more speed, the final dome takes a different approach.
Morphe M133 Domed Concealer Brush
Best for Quick Buffing
A compact rounded dome can diffuse concealer across a patch without a tiny pointed tip.
You may want to cover an under-eye patch quickly rather than place concealer dot by dot. The compact M133 head has dense vegan fibers and rounded edges for pressing, sweeping or buffing creams and liquids.
That shape makes a little more sense for a modest area than for a single tiny mark. The catch is familiar: wider movement can shear product across the skin unless you first set it down and blend gently.
Bottom line: Our quick-buffing pick for medium patches, with less pinpoint control than a spot brush.
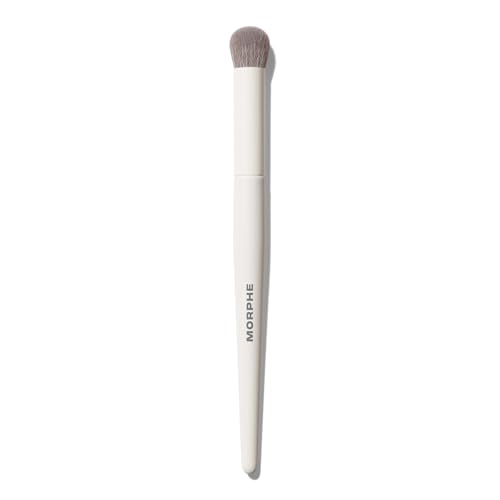
- ✅ Compact dome for controlled buffing
- ✅ Dense vegan brush head
- ✅ Cream and liquid formula use
- ❌ Rounded head cannot isolate one small spot as well
- ❌ Sweeping too widely can move nearby base makeup
🧪 Lash Lab Notes — Zayba (A-Level Student & Beauty Enthusiast)
The rounded edges suit a patch that is too large for repeated tiny dabs. Press product into the center before sweeping around the edge to preserve the coverage you wanted.
- 💡 Editor’s Note: We would reach for this head when speed matters but a giant face brush feels clumsy. If your daily touch-up is a single pinpoint mark, the smaller Real Techniques tip is still the more precise answer.
Wondering whether its size feels practical outside product photos? Scan comments on Morphe M133.
Useful for blending cream concealer across a modest under-eye or facial patch.
Care tip: Apply cream or liquid concealer using light pressing or buffing motions.
The differences become much easier to use once you match head shape to the actual area.
How to Choose a Concealer Brush for Your Needs
Begin with the surface you need to cover, not the packaging. A narrow tip reaches one mark without moving much makeup, while a half-moon or angled paw can sit more naturally along the curve beneath an eye. A denser round dome is better suited to pressing cream concealer over a somewhat larger area.
For isolated blemishes, choose the smallest workable contact area. It helps you keep correction where it belongs, then blur only the edge. For under-eye work, think about the arc of the brush as well as its softness; a curved head can follow the area more directly than a flat detail tip.
Brush density changes how you move product. A compact dome or dense paw can press concealer onto the skin, whereas a fluffier blending end is intended to soften a boundary after placement. More density does not automatically mean a concealer gives fuller coverage; the formula and amount you apply still matter.
Once you recognize these shapes, it is easier to see how they differ from larger powder or foundation brushes. The broader brush-type guide explains where each neighboring head belongs.
You may also be deciding whether to use a brush at all. The dedicated applicator comparison explains how the technique changes with a sponge or fingertip.
👉 If tiny marks are your main frustration, the Real Techniques Spot Brush review above explains why a narrow tip helps.
Once the shape fits your routine, the next job is keeping that tool clean enough to use regularly.
How to Keep a Concealer Brush Clean
Concealer brushes touch products and facial skin repeatedly, which makes a simple washing routine worthwhile. The American Academy of Dermatology recommends washing makeup brushes every seven to ten days, wetting only the bristle tips and laying brushes flat to dry.
Avoid soaking the area where the bristles meet the handle, and do not share a brush used on your face. Allow it to dry before the next application instead of storing it while damp.
A concealer brush needs routine care, but these buying tips are not a full washing tutorial. The dedicated cleaning walkthrough covers each step in order.
Keeping the brush clean is one part of the decision; how you use it with different formulas raises a few more questions.
Concealer Brush Questions, Answered
Brush shapes are only half the picture. These short answers cover the application questions that still matter once you have picked a head.
❓ Does a brush work better for under-eye circles?
A brush can give you controlled placement, especially with a curved head, but there is no universal winner for every skin texture or concealer formula. Use light pressure and judge whether a brush gives you the finish you want.
❓ Can I use a concealer brush for cream and powder?
Some brushes work with more than one texture, but compatibility depends on the design. For example, the ABH Brush 18 is described for targeted emollient or powder use, while several other picks here are designed chiefly for cream or liquid concealer.
❓ Is a tiny brush better for blemishes?
A tiny tip is often easier for precise placement on an individual mark because it touches less surrounding makeup. It is usually slower for a broad patch, which is when a paw or dome can be more efficient.
❓ How often should I wash it?
The American Academy of Dermatology recommends washing makeup brushes every seven to ten days. Wash the bristles gently and let the brush dry flat; the cleaning guide above covers the full method.
Final Thoughts: Choose the Shape, Not the Price
One head cannot be the tiniest precision tip and the quickest under-eye buffer at the same time. If you move between facial corners and under-eyes, start with a paw shape; for a single blemish, choose a smaller point. Match the brush to the area you actually cover, and the decision becomes much simpler than comparing price tags.
👉 Still choosing a first brush? The e.l.f. Tap & Blend review above shows the straightforward paw-tip option.
Last update on 2026-11-18 / Affiliate links / Images from Amazon Product Advertising API